Twitter Fountain (n.) a fountain that pours water into a vessel every time someone tweets with a particular hashtag
Why should you build one?
A Twitter Fountain is a fun way to encourage people to tweet at your event.
Are you an event organizer? Are you tired of standing up on stage, lingering on the social media slide, and pleading for people to “pleeeease tweet”?
By using the Twitter Fountain, tweeting at an event becomes a collective and tangible goal. You can now hop on stage and announce to attendees, “Our goal this evening is to fill the entire fountain with ‘tweets.’”
The Twitter Fountain has delighted attendees at two conferences with over 500 participants!
Check out highlights of people interacting with the Twitter Fountain in the 1min video:
How It Came About
I came up with the idea of a Twitter Fountain in 2014 for the world’s first Grand Hack, the largest health hackathon in the world at the time. As an organizer for the event (learn more about MIT Hacking Medicine here), I was sad that I wouldn’t get to “hack” and build things during the weekend so I decided to do a hack for the event instead.
I challenged myself to build something that would encourage people to tweet more during the Grand Hack (#grandhack). I came across a tutorial for creating a “Raspberry Pi Twitter Monitor1” and then this one for building a “Self Watering Plant2.” I put them together and voila! …the Twitter Fountain was born!

Check out a video explaining more about how the Twitter Fountain works in this 1min video from the 1st version of the fountain built in 2014:
People are amazed at how quickly their tweet manifests in a real-life event (<2 seconds between pressing the ‘tweet’ button and seeing the fountain fill up). It’s cool to connect our online social media world with the physical world!
@lina_colucci@annakyoung coolest hack – tweet #grandhack and fill up the the idea fountain! http://t.co/K7TcroiNHf
— Zoe Barry (@ZoeBarryCEO) March 15, 2014
The #GrandHack Twitter fountain is going nuts during the final pitches! Almost full! pic.twitter.com/qPN840thwe
— Robert S. Pugliese (@theEDpharmacist) May 1, 2016
One more #GrandHack drop in the Twitter fountain. Thanks @mithackmed – it’s been a great event!
— Brian M Bot (@BrianMBot) May 1, 2016
So excited to be at @mithackmed #GrandHack this year!! Love the Twitter fountain! pic.twitter.com/CFX57gXFNi
— Andrea Ippolito (@andreakippolito) April 30, 2016
Photos of the Twitter Fountain
Tutorial
How to Build Your Own Twitter Fountain
Much credit goes to the two tutorials1,2 that inspired the Twitter Fountain and I highly encourage you to check them out. But instead of making readers have to read and reconcile 3 different tutorials in order to build the Twitter Fountain, I will re-post content from the other tutorials here, in addition to filling in gaps where I found information to be lacking (especially circuitry details and how to use a Raspberry Pi), and adding specific instructions for the Twitter Fountain.
Assumptions: This tutorials assumes you know how to solder and use a breadboard but that you’ve never used a Raspberry Pi before.
Without further ado, here are instructions on how to build your own Twitter Fountain!
Step 1. Get stuff
The Pumping and Electronics Stuff
(x1) 8″ x 6″ x 3″ project enclosure (Radioshack #270-1809)
(x1) Multipurpose PC Board (Radioshack #276-150 or via Amazon)
(x1) 5VDC SPDT micro relay (Radioshack #275-240)
(x1) Non-submersible electric water pump (via Amazon)
(x1) Water storage container (ideally something with a lid)
(x2) 3′ – 5′ pieces of 3/16″ standard plastic tubing (via Amazon)
(x6) 4-40 x 1″ nuts and bolts (via Amazon and Amazon)
(x6) 1/4″ spacers that fit over your 4-40 bolts (via Amazon)
(x1) Wire nut (i.e. twist on wire connector) (via Amazon)
(x1) NPN 2N3904 transistor (via Radioshack or Amazon)
(x1) 1A 1N4004 Diode (via Radioshack)
(x1) 10 Ohm resistor (via Radioshack or Amazon)
(x3) Header pins and cables (the RPi needs cables that are female on one end, the other end is up to you) (like this and/or this)
(x1) Soldering supplies
The Raspberry Pi Stuff
- Raspberry Pi Model B (via Amazon or many other vendors)
- SD card (at least 4Gb, recommended 8GB). (I use this one and recommend it)
- HDMI-capable monitor (or TV) (The Raspberry Pi has an HDMI port and you’ll have to connect your RPi to a monitor or TV. If you find the proper adapters, you don’t need a monitor with an HDMI port, per say, but might make your life easier)
- HDMI cable (assuming your monitor/TV has an HDMI port, both sides of your cable should have an HDMI connector, via Amazon. Otherwise you’ll need a cable with an HDMI connector on one side and whatever your monitor/TV has on the other.)
- USB keyboard (and optional mouse) (both keyboard and mouse should have a CABLE coming out of them. No fancy wireless things here. We’re going old school. It’ll make your life easier if this is your first time using a Raspberry Pi.)
- An Ethernet cable (via Amazon or many other vendors)
- A GOOD QUALITY micro USB power supply that can provide at least 700mA and 5V. (Poor quality chargers will make your life harder. I have this one. I don’t fully endorse it. It makes worrisome noises while it’s on. But I haven’t gotten around to buying a new one so I’ve used this power supply for about 80+ hrs and it hasn’t given me a problem yet.)
- If your computer doesn’t have an SD card slot, you’ll need to buy an SD card reader (via Amazon)
The Fountain Head
For the fountain head, you’ll need access to a 3D printer OR time and money to order an online 3D print. Two online stores that you can order 3D prints from include Shapeways and Ponoko. There are others.
The Peripherals and Installation
You can improvise this based on your location and needs. At a minimum, you need a vessel to collect the water that falls the fountain (I used something like this large vase), a taller location for the fountain head and water reservoir to sit, and access to an ethernet port and outlet that your fountain can connect to.
Step 2. Register Your Twitter App
Note: this step is taken verbatim from the following Sparkfun tutorial (https://learn.sparkfun.com/tutorials/raspberry-pi-twitter-monitor/all#the-twitterverse).
In order to interact with Twitter (including searching, monitoring, posting, etc.), you will need to register your application. This is accomplished by going to https://dev.twitter.com/.
Click the “Sign In” button at the top-right of the screen and enter your Twitter credentials (you can also sign up if you don’t have a Twitter account).

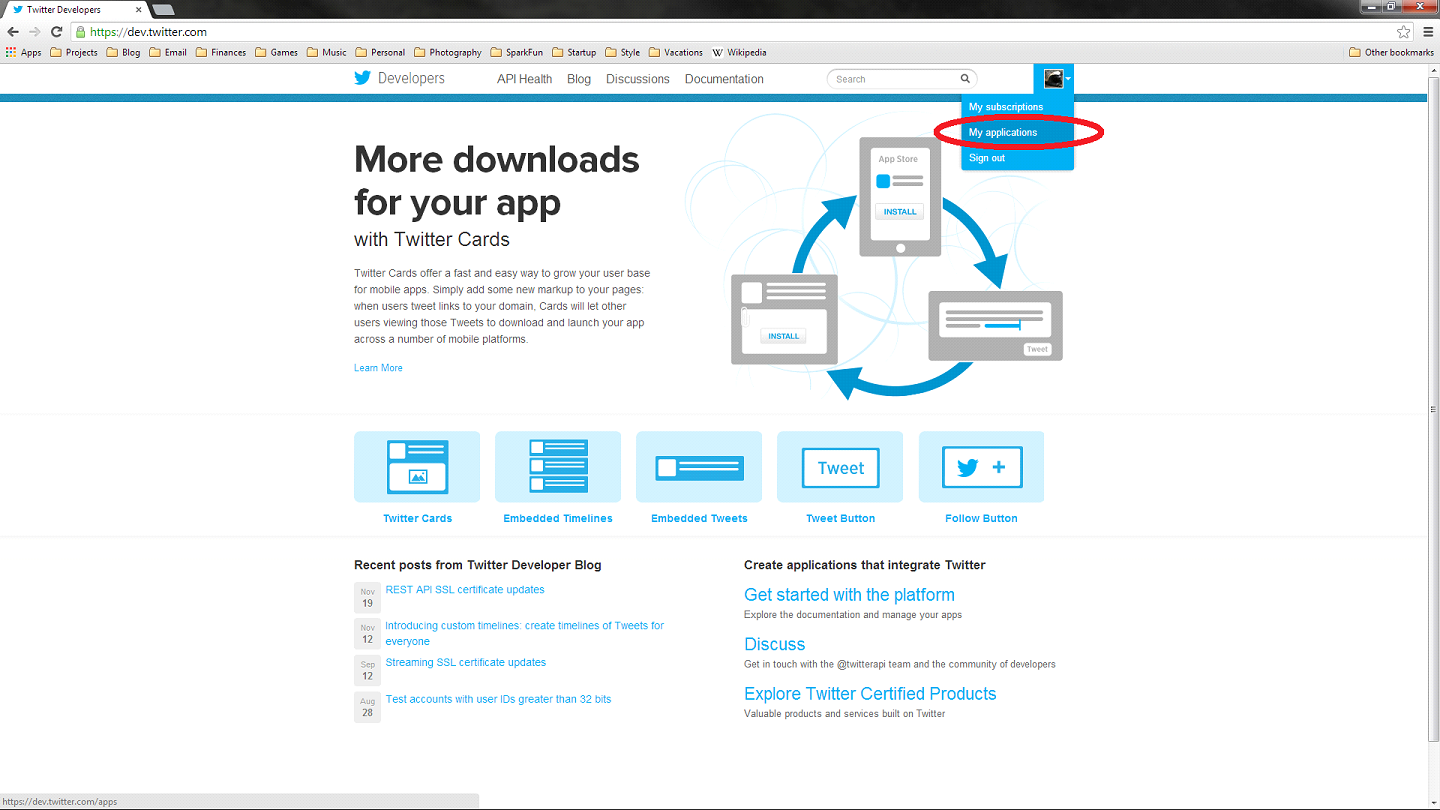
Once you have signed in, click on your user icon, and select “My Applications.”
Click the “Create a new application” button, and you will be presented with a form to fill out about your application. Fill out the name and description fields. For “Website,” you can put something random, like http://github.com or something else that looks legitimate. At the bottom of the page, click the checkbox to agree to the rules, fill out the Captcha, and click the “Create your Twitter application” button.

Once completed, you will be presented with a dashboard for your registered application. You need to create an access token, so click the “Create my access token” button at the bottom of the screen.
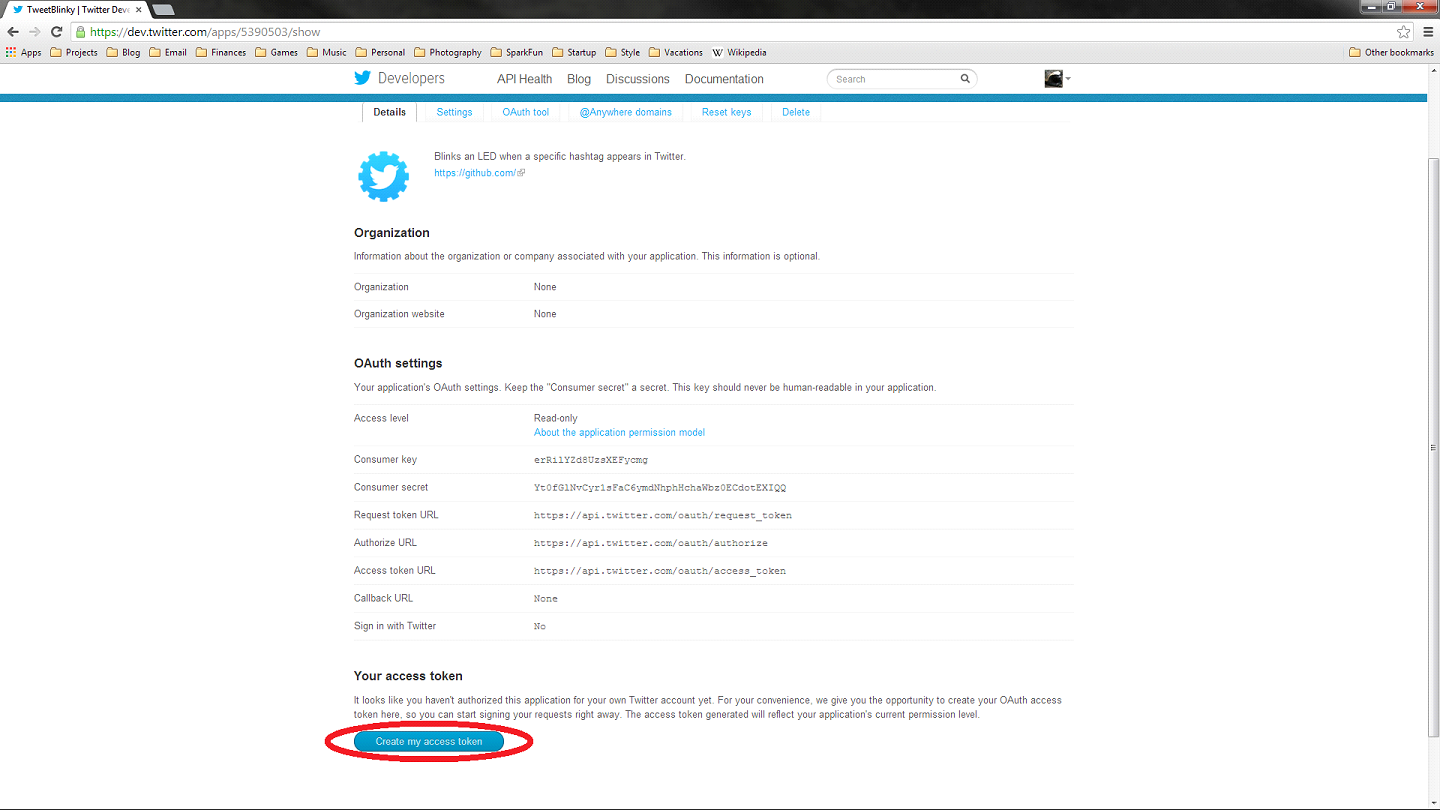
Wait a few seconds and then refresh the page. You should see a section titled “Your access token” at the bottom. Copy down the “Consumer key,” “Consumer secret,” “Access token,” and “Access token secret.” We will need these for our application. Note that we set up this Twitter application as an example. It will have been deleted by the time you read this, so don’t be trying to use our tokens!

Step 3. Get your Raspberry Pi to monitor the Twittersphere
(Step 0) If you have never used a Raspberry Pi before and are looking for help getting started, follow Steps 1-3 of these amazing instructions: http://lifehacker.com/the-always-up-to-date-guide-to-setting-up-your-raspberr-1781419054 (Note: there’s no need to go beyond Step 3 for our purposes).
When you’re at the point where you’re looking at the terminal screen of your Raspberry Pi’s OS (we use Raspbian) with the keyboard (and optional, but nice to have mouse) hooked up, read on!
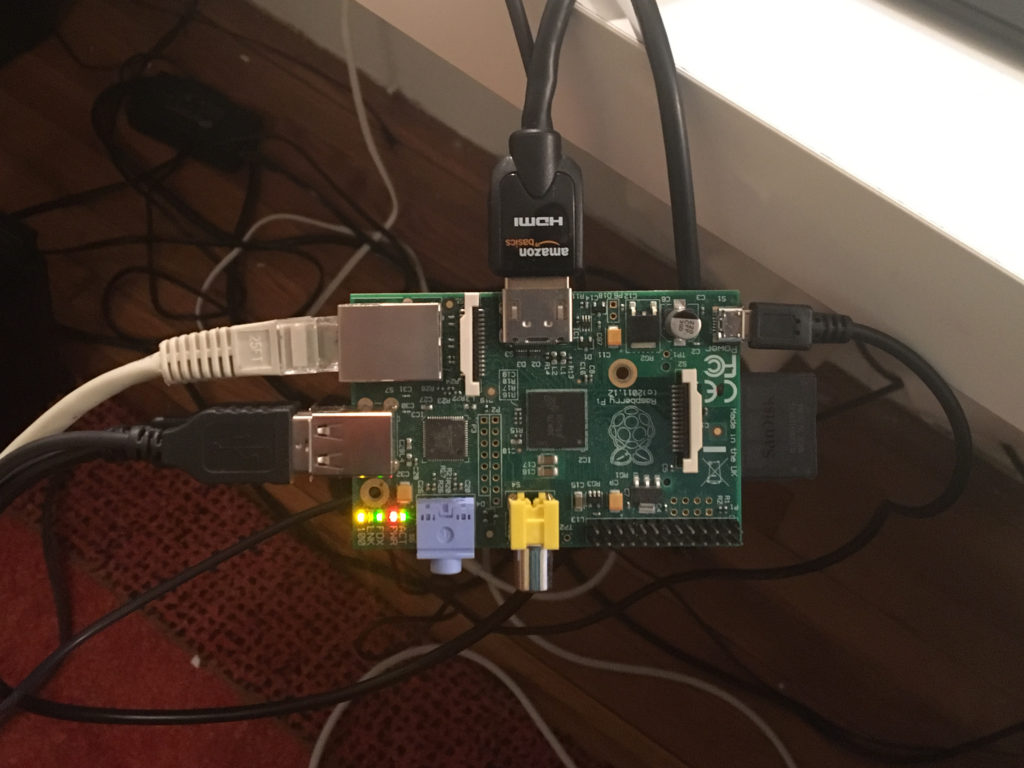
A Raspberry Pi with HDMI Monitor, Ethernet, Power Supply, and USB Mouse hooked up.
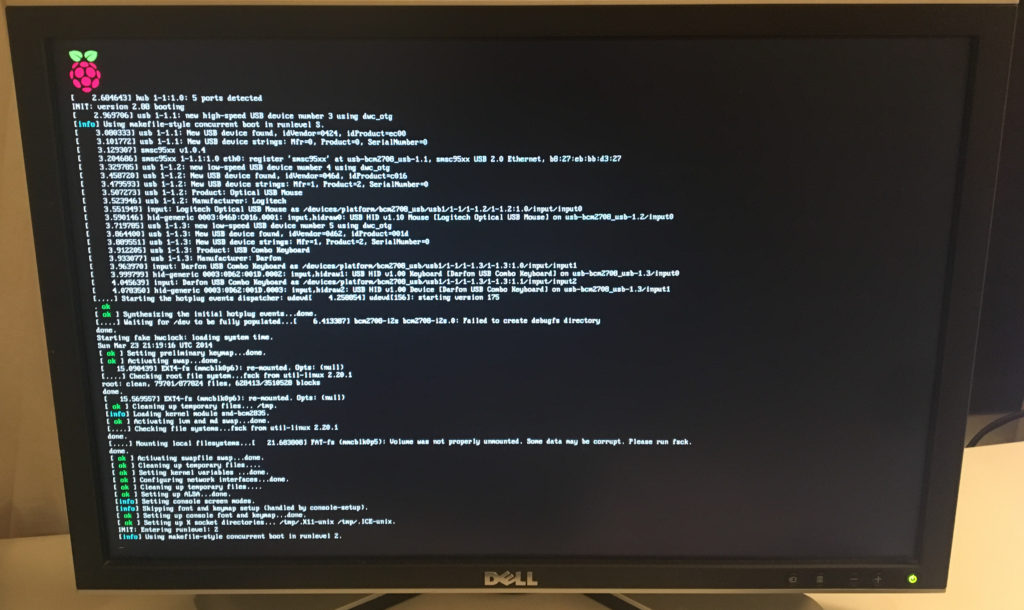
Once the Raspbian OS is installed and you plug in the power supply to the RPi, the RPi will boot up and your monitor screen will look something like this. We will be doing all our work from the terminal line (i.e. the screen looks like this and not a regular desktop). If you are looking at a regular desktop, search for an application called “terminal,” open that up, and do your work there.
- Boot up your Raspberry Pi (by plugging in the power) and use the terminal navigate to whatever folder you want to create your Twitter Fountain program in.
If you forget, your default RPi password is probably:
- Login: pi
- Password: raspberry
To create a new folder on your Desktop, type something like:
cd ~/Desktop
 mkdir twitterfountain
Then type
ls
to view the contents of your Desktop (i.e. make sure the new folder is there).
To navigate into your new Twitter Fountain folder, type:
cd twitterfountain
2. Install required packages by typing the following lines on your terminal:
sudo apt-get update
sudo apt-get install python-pip
sudo pip install twython
3. Write a Python script to connect the RPi to the Twittersphere.
Type this command to create a new Python script called TwitterFountain.py within your folder and open it with a text editor called nano (there are many others editors):
nano TwitterFountain.py
Copy and paste this code into your editor:
import time
import RPi.GPIO as GPIO
from twython import TwythonStreamer

# Search terms (i.e. the Twitter hashtag of interest)
TERMS = '#love'

# GPIO pin number of pump (connected to NPN transistor base)
PUMP = 22

# Twitter application authentication
APP_KEY = 'erRilYZd8UzsXEFycmg' #Insert your consumer key
APP_SECRET = 'Yt0fGlNvCyr1sFaC6ymdNhphHchaWbz0ECdotEXIQQ' #Insert your consumer secret
OAUTH_TOKEN = '1969690717-6a2RgVPXanSBaAjuie7EmUWZh78me8UZ6UxcM8V' #Insert your access token
OAUTH_TOKEN_SECRET = 'UIrYV2XbYZC3vHzer6ZxIDwqVa0VvynQLDJYnSQV0R3xt' #Insert your access token secret

# Setup callbacks from Twython Streamer
class BlinkyStreamer(TwythonStreamer):
        def on_success(self, data):
                if 'text' in data:
                        print data['text'].encode('utf-8')
                        print
                        GPIO.output(PUMP, GPIO.HIGH)
                        time.sleep(0.5)
                        GPIO.output(PUMP, GPIO.LOW)

# Setup GPIO as output
GPIO.setmode(GPIO.BOARD)
GPIO.setup(PUMP, GPIO.OUT)
GPIO.output(PUMP, GPIO.LOW)

# Create streamer
try:
        stream = BlinkyStreamer(APP_KEY, APP_SECRET, OAUTH_TOKEN, OAUTH_TOKEN_SECRET)
        stream.statuses.filter(track=TERMS)
except KeyboardInterrupt:
        GPIO.cleanup()
Important! Note that you’ll have to substitute your own Twitter Authentication tokens (everything that’s black and bolded) from Step 2. Right now, they are set to the tokens from the example above and are not real.
Save the code and exit out of nano by typing:
ctrl + X
y
4. Now we will actually run the script and make sure that it works. Type the following command into the terminal:
sudo python TwitterFountain.py
You will see a tweet pop up on your monitor every time someone tweets with your particular hashtag (in bolded green in the code). I take no responsibility for the appropriateness of the tweets that appear! You can change the hashtag to whatever you want by entering the nano text editor and editing the “TERMS” variable in bolded green. Stop running the script by pressing Enter.
If this is working, great! You’re done with the software, time to move on to the hardware!
Helpful Linux Commands:
- To list out contents of your folder: ls
- To navigate into a particular folder: cd
- To create a new folder: mkdir
- If the computer says you don’t have enough permission to do something, repeat the command with “sudo” typed in front. “Sudo” allows you to run things with superuser privileges.
Other Helpful Tips:
- A short and sweet guide for using the nano text editor: https://wiki.gentoo.org/wiki/Nano/Basics_Guide
- To learn more about what the code does, check out the following tutorial: https://learn.sparkfun.com/tutorials/raspberry-pi-twitter-monitor/all#the-twitterverse
- If you’re new to the command line (i.e. this black screen with white text that doesn’t look remotely like the computer you’re used to) and are not sure what’s going on, don’t worry! You’ll get it. Here is a tutorial to get you started (you can practice on your laptop): http://www.galvanize.com/learn/learn-to-code/programming-101-how-to-use-the-terminal-command-line/
- I remember the first time I installed something using the command line. It was a moment of revelation. At first I was amazed, “That’s it?! It’s already done??” Then I started wondering what I had been doing all my life by wasting so much time installing things from a disk image. Moral of the story, is that the terminal is magical in many ways once you know how to use it.
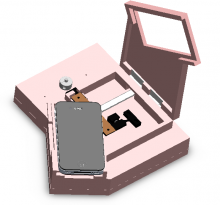
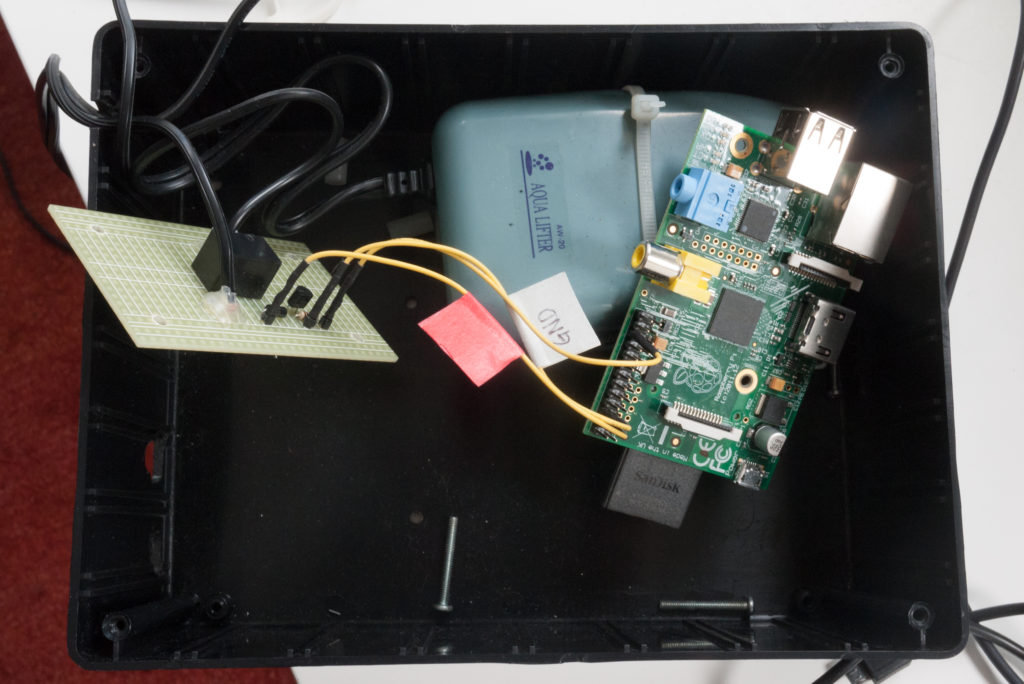
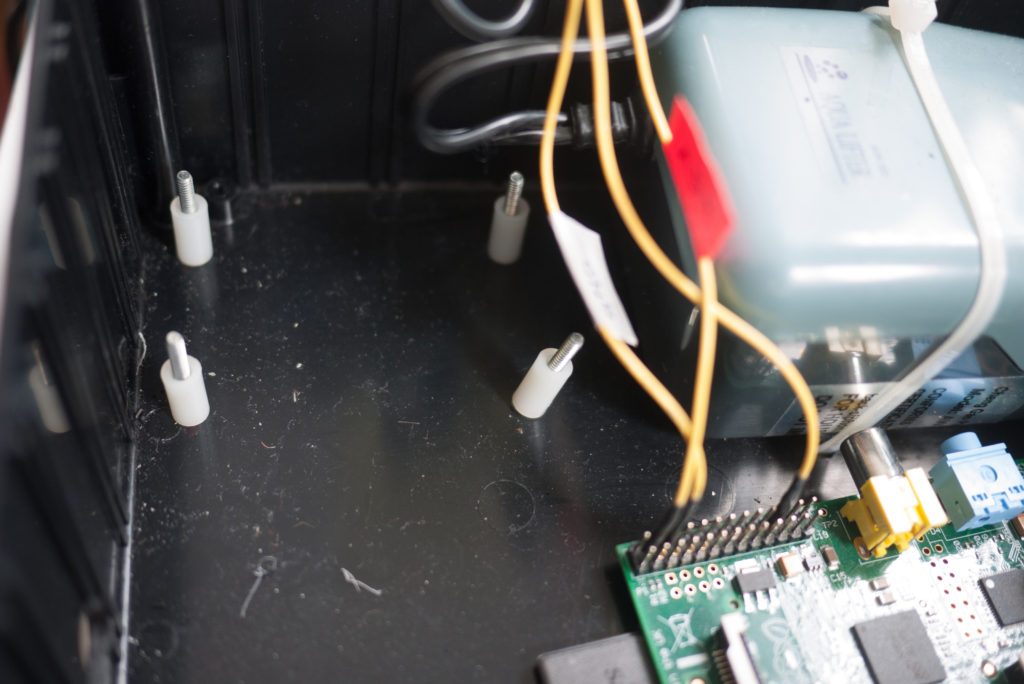
Step 4. Build the Box
4A) Trim the pump


4B) Drill or cut


This is the hole that the pump nozzle will stick out of. Line up the water pump with the base of one of the 6″ x 3″ sides of the case. Drill or cut a hole large enough to fit the aquarium pump’s nozzle through.
4C) Mark


Position the water pump, Raspberry Pi (note that a Arduino, NOT an RPi, is pictured above) and circuit board in the bottom of the case.
Make marks in each of their mounting holes. The pump will probably not have a mounting hole, so just make a mark on each side such that it can easily be zip tied down.
4D) Drill


Drill all of the holes that you have just marked with a 1/8″ drill bit. You may need to widen the zip tie holes to 3/16″.
4E) Drill more holes


4F) Fasten


4G) Cut the cord


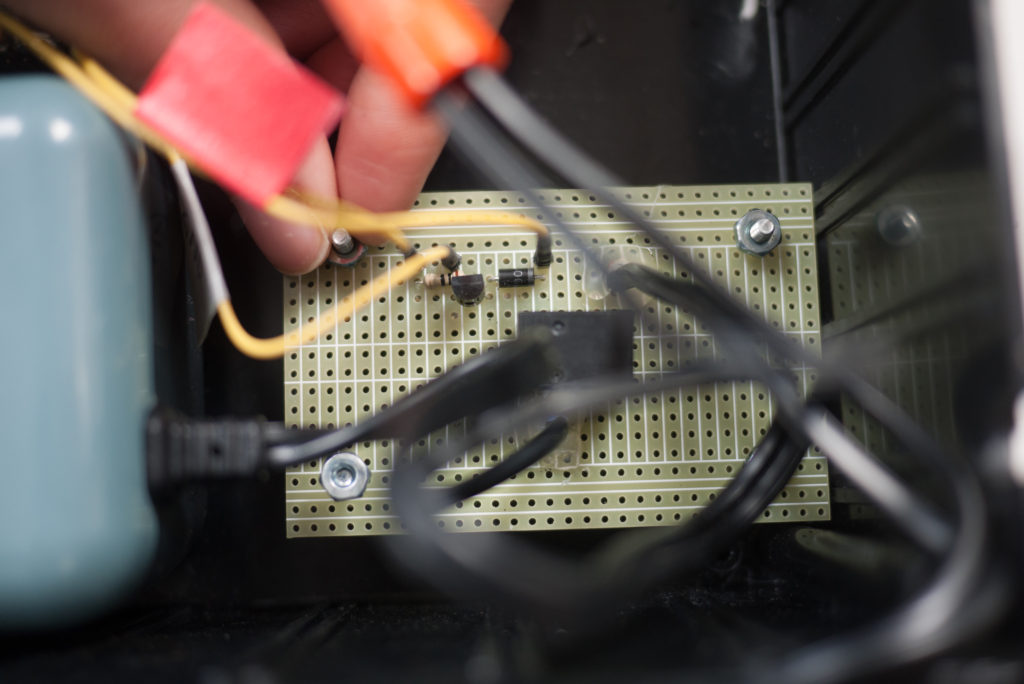
Step 5: Build the electronics
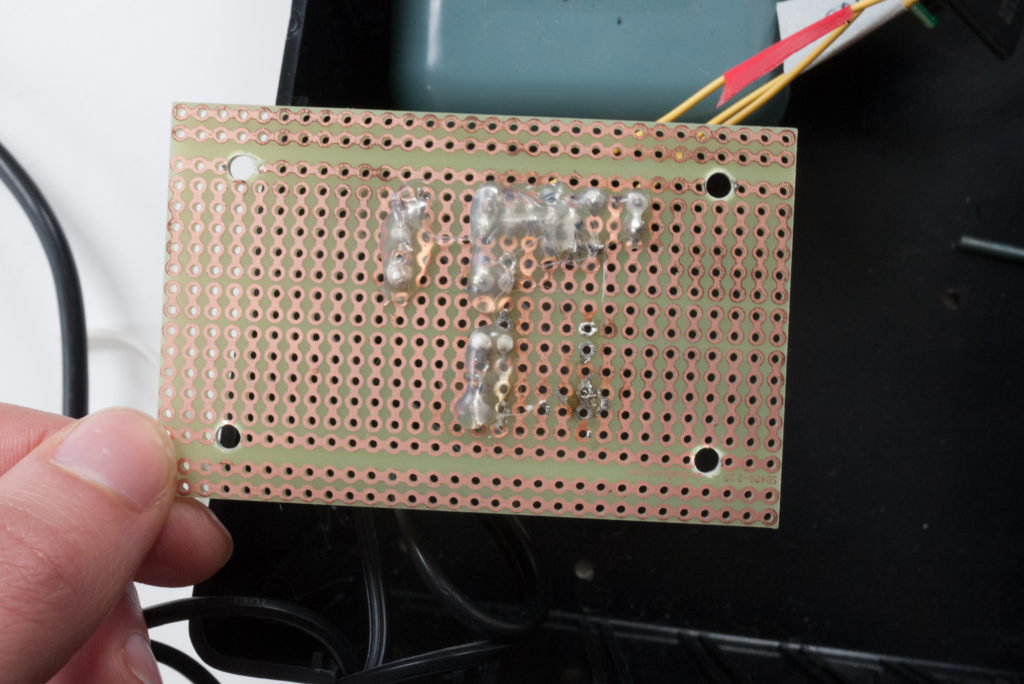
5A) Solder the electrical components onto the circuit board
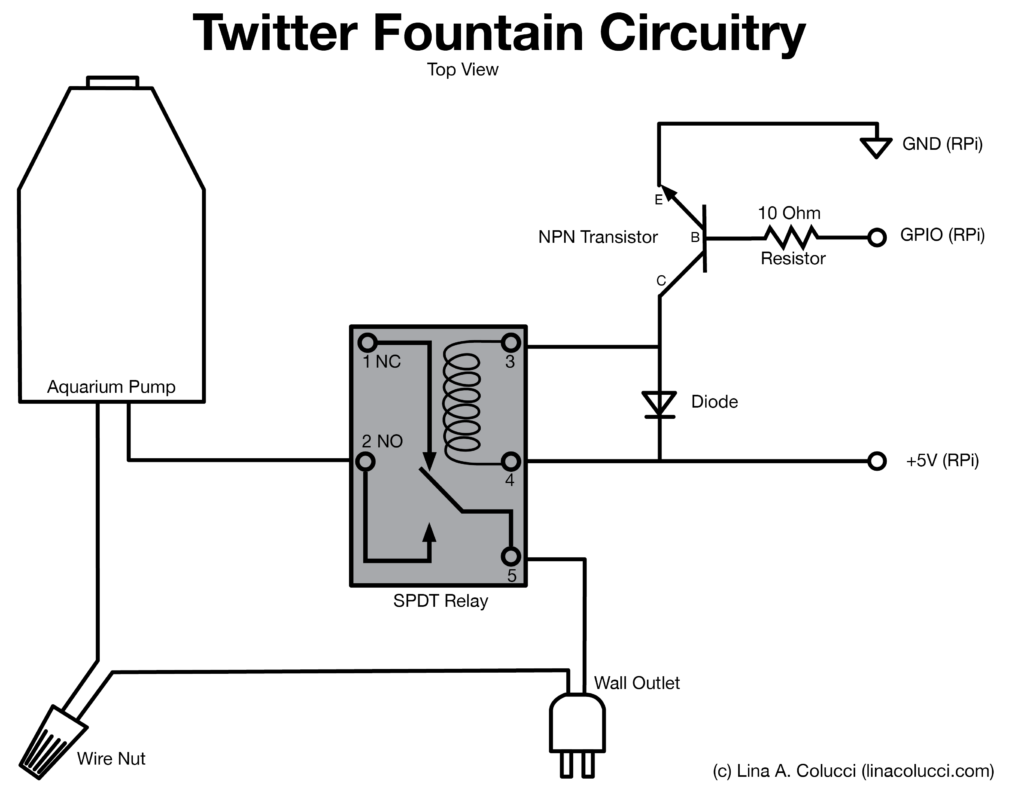
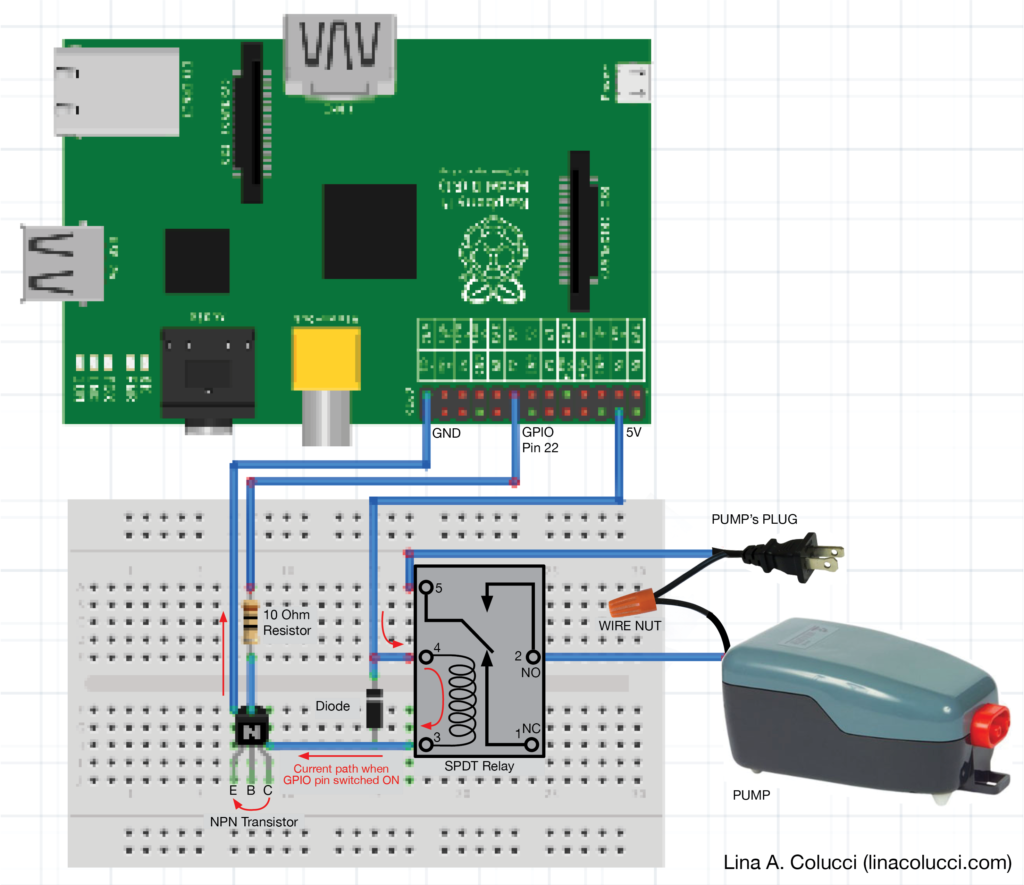


5B) Test that it is working
CAUTION!!! Water and electronics do not mix well! Be extremely careful to not get water on your circuitry.
Once all of your connections are made both on the circuit board and the Raspberry Pi, test out that the electronics are working. Power up your RPi, navigate to the folder with your TwitterFountain.py script and type “sudo python TwitterFountain.py” on the command line. You should see the tweets pop up on your terminal screen, you should hear an audible click of your relay every time a new tweet appears, and (if you’ve gotten your pump tubing hooked up) you should see water moving through the tubing with every tweet.
https://youtu.be/MOi4TfNb8GU
You’ll see that I first prototyped the system on a breadboard, which is a great strategy to make sure everything is working before committing it with official solder.
HOW TO DE-BUG? If you’re Twitter Fountain isn’t working and you’re trying to de-bug this particular step of it, you can follow the steps in this tutorial to hook up an LED to your Raspberry Pi and ensuring the LED is turning on every time a Tweet comes up. https://learn.sparkfun.com/tutorials/raspberry-pi-twitter-monitor
Step 6: Attach it all together
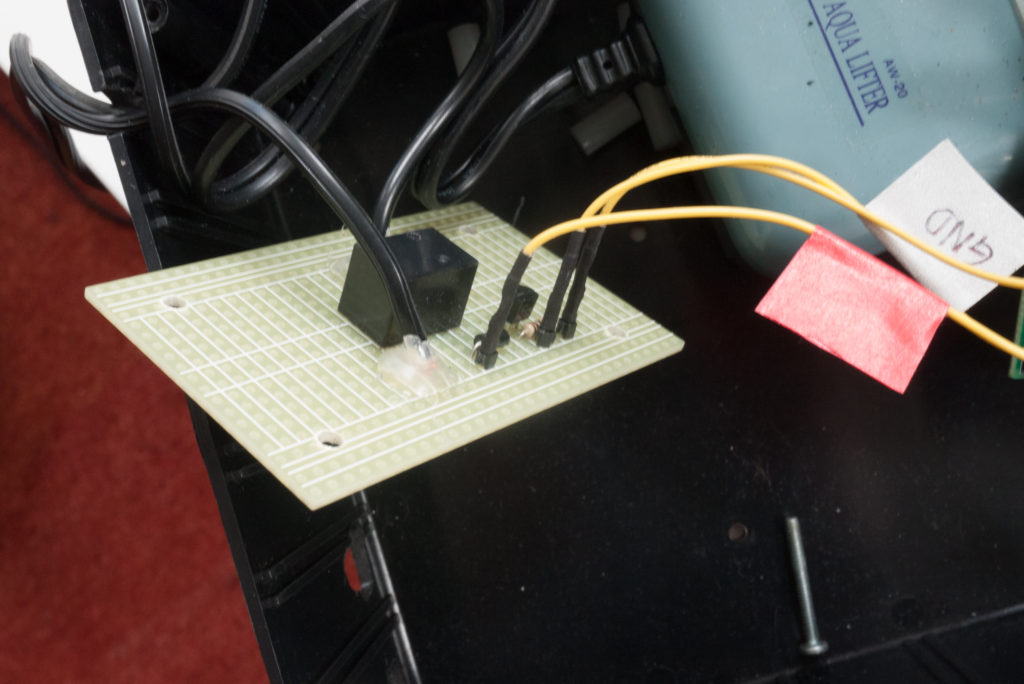
6A) Circuit Board

6B) Cables
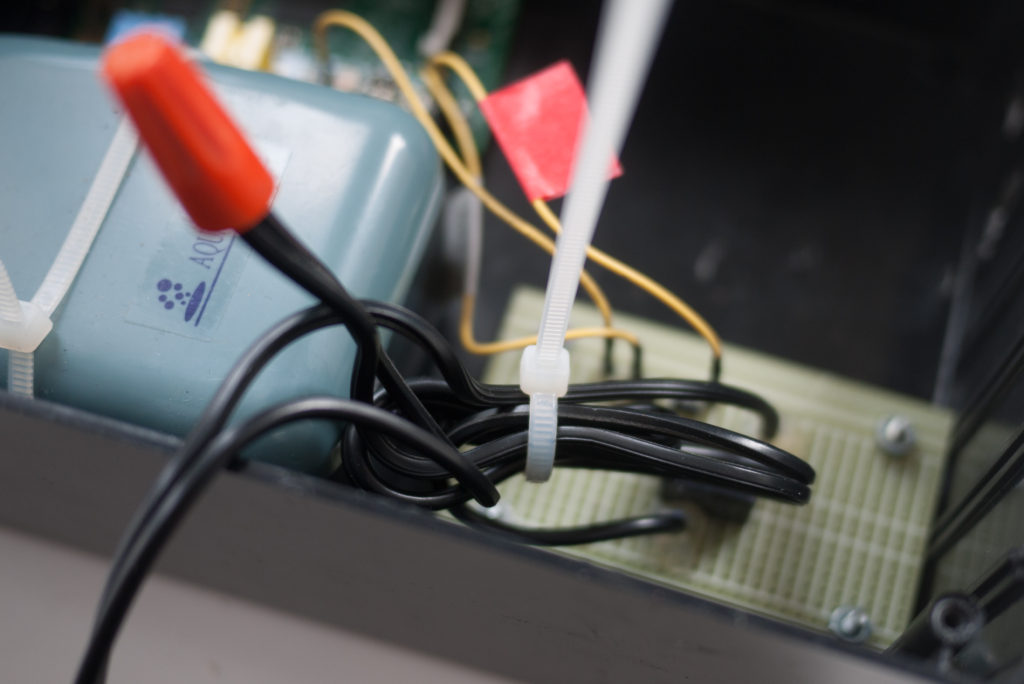
6C) Tubing
If you haven’t already, cut the tubing in half. Plug a tube into each of the pump’s connector valves.


6D) Done!

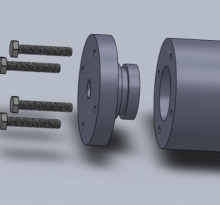
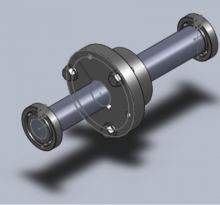
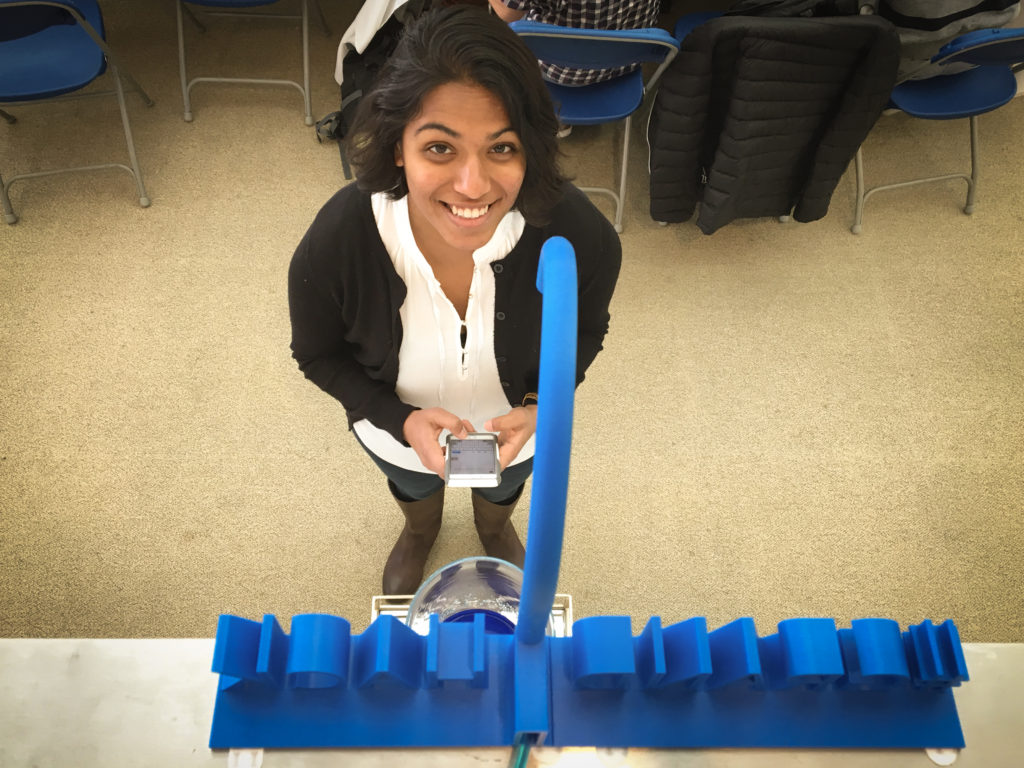
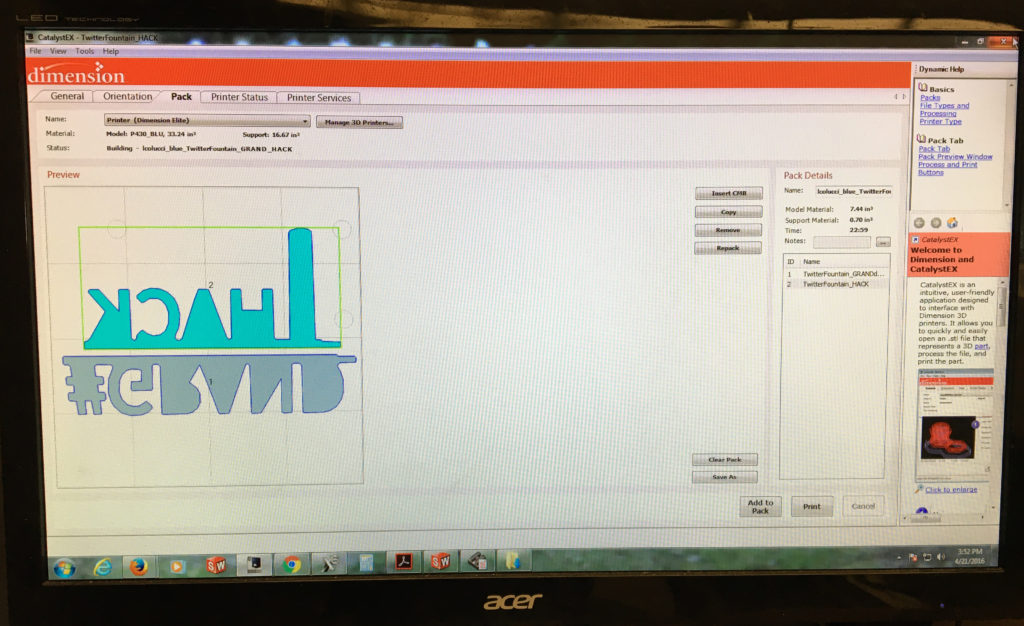
Step 7: The Fountain Head
There are many possible ways to set up your Twitter Fountain depending on your space. If you are using a ledge with a vase collecting water beneath it, you’ll need some sort of structural support to hold the floppy tubing.
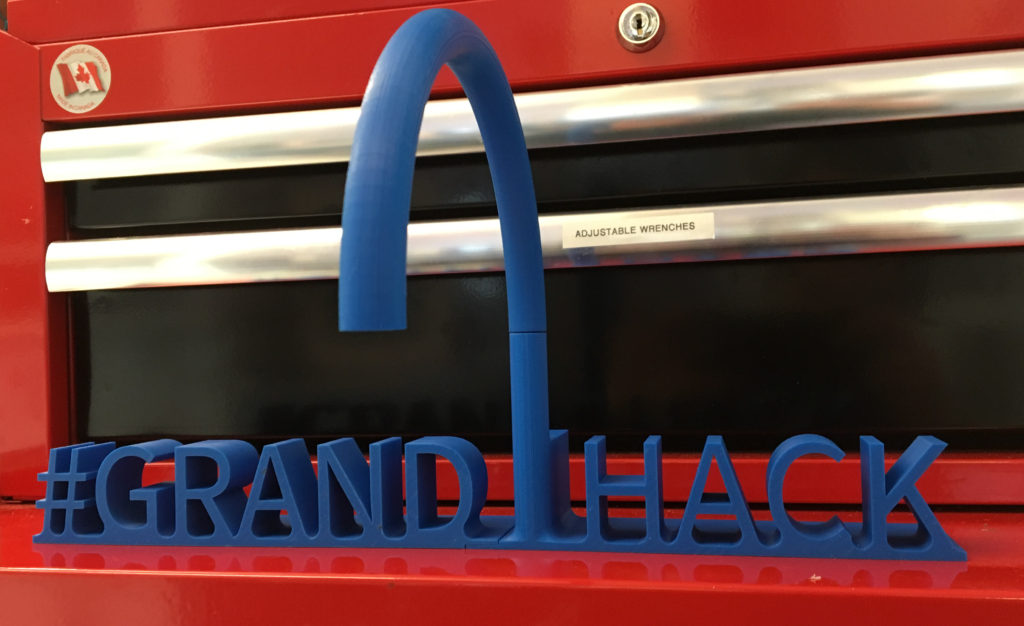
I made a 3D printed fountain head with the event’s hashtag: #GRANDHACK.
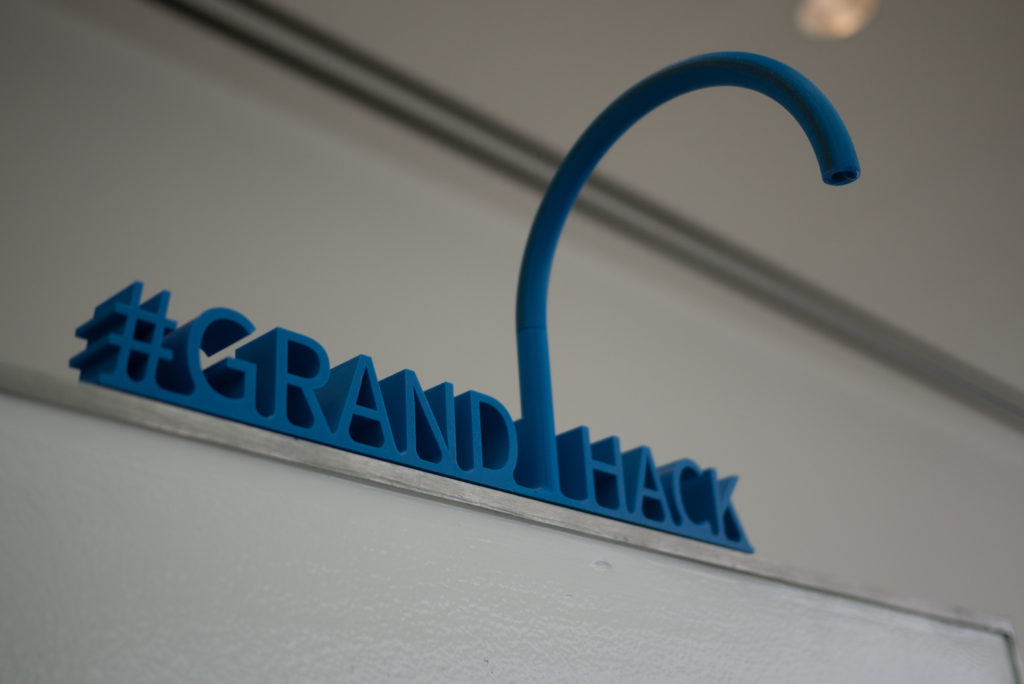

Here’s how you can make your own!

I decided to try OnShape – the first and only full-cloud 3D CAD software – for this project and it is unbelievable! (I mostly used Solidworks and a bit of Rhino before).
All you need for OnShape is an internet connection. You just open up a browser on any device, go to www.onshape.com, and you have a full CAD suite at your fingertips. Doesn’t matter if you are on a Mac, PC, Linux, tablet, iPhone, or anything else.
Say goodbye to massively long installation times! There’s no need to install anything with OnShape.
OnShape automatically saves your documents as you go (no more losing hours of work because you forgot to save or because Solidworks crashes for the umpteenth time). OnShape also automatically does version control so you can easily go back to what your part looked like at any point in time. Beautiful.
I have not used OnShape with a team yet but one of the great benefits of OnShape is that teammates can work simultaneously on the design or on different branches (Github brought to Mechanical Engineering!).
OnShape was created by the creators of Solidworks who realized that CAD software has not evolved much. Cloud CAD is the future and the future looks mighty fine.
If you couldn’t already tell, I highly recommend OnShape (and I’m not getting paid for this). In addition to being amazing, it’s also FREE! So anyone can get started using OnShape immediately.
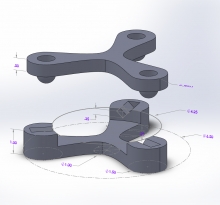
Here is the file for my Twitter Fountain fountainhead. You can 3D print it for your own fountain. Feel free to modify my design or start from scratch.
Twitter Fountain CAD File: https://cad.onshape.com/documents/58115efe66ec9a10683b9825/w/31ec3ae5e757342b118c3214/e/09e82a3ea870ba624bc0c15e

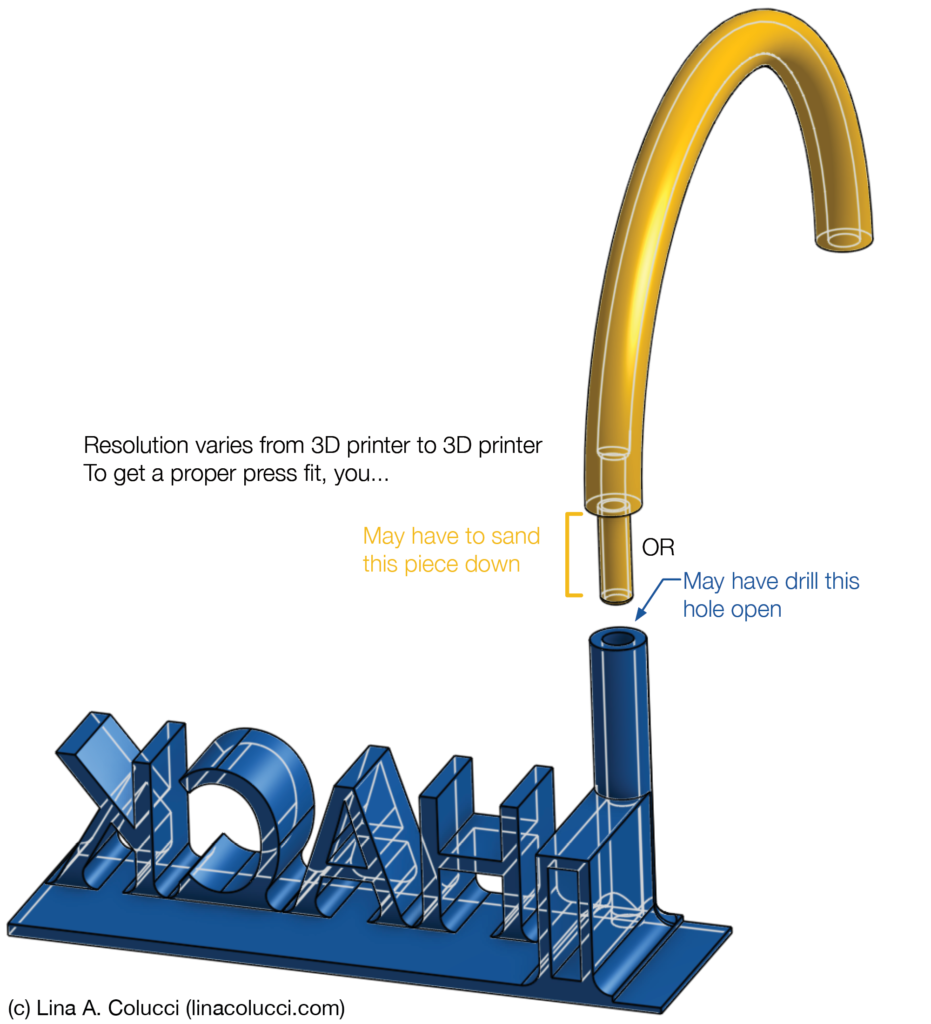
Note: I made a mistake in my original fountainhead design by not making the connection point between the fountain tube and the HACK piece wide enough for the aquarium pump tubing to pass through. I fixed this issue in the part I’ve linked to. However, I have not 3D printed this new part to verify my improvement actually works. If you print it out, please leave a comment letting us know how it works – thanks!
FYI: Since the resolution of each 3D printer is different, I did not attempt to properly size the press fit of these two tubes. Their diameters are equal and so you will have to do some sanding or drilling to get the press fit just right.
Thank you! A huge thank you to Mark Belanger and Oksana of the Edgerton Shop for their help with designing and printing the fountainhead. The Edgerton Shop is one of my favorite parts of MIT mostly because Mark and Oksana are phenomenally helpful, knowledgable, and wonderful people.
If you don’t have access to a 3D printer, there are many online stores that where you can order 3D prints and have them mailed to you. Options include Shapeways, Ponoko, and others. I have not personally used any of them.
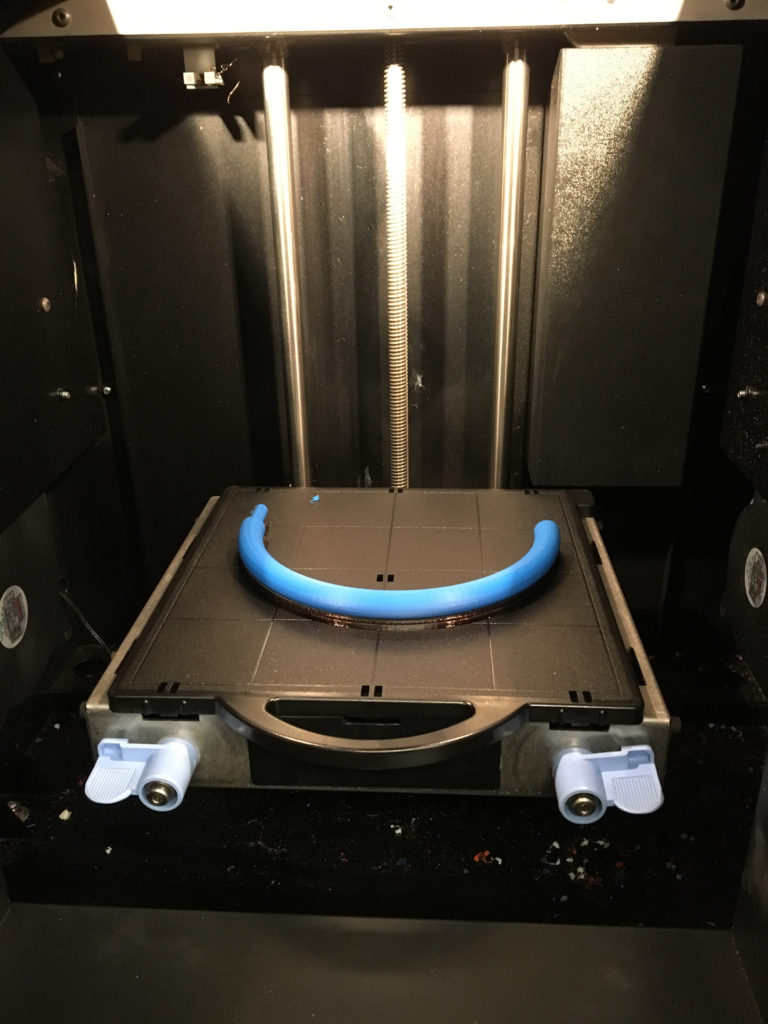
Setting up the 3D prints:
The tube after 3D printing is completed.
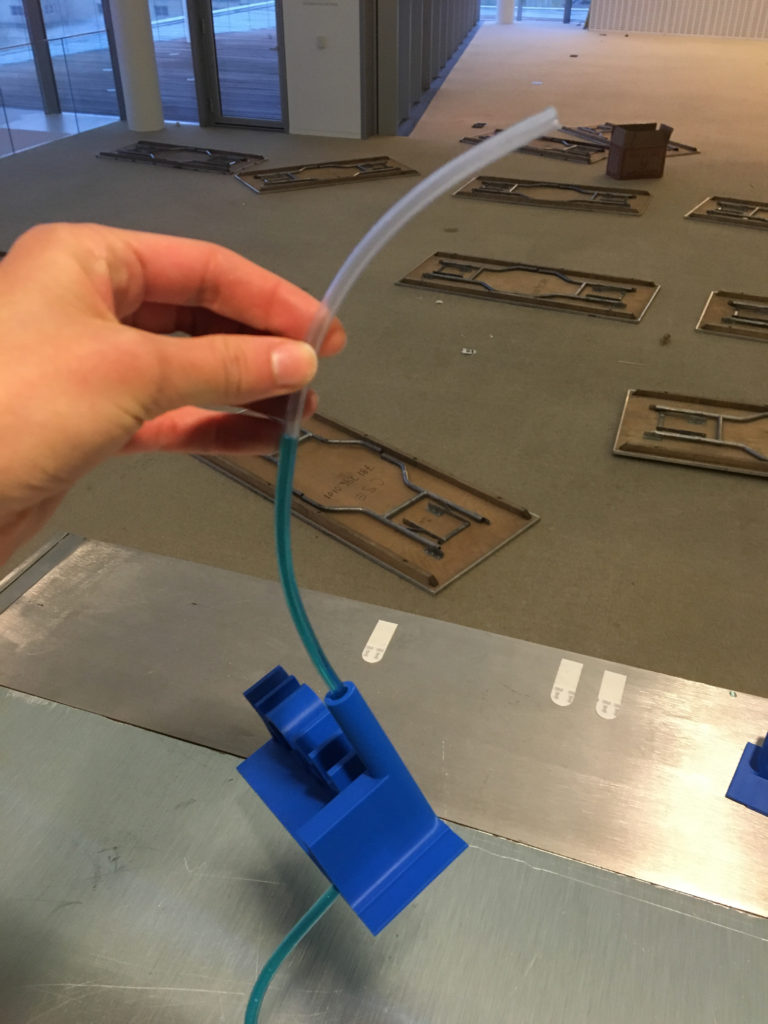
Enlarging the hole a bit for a nice press fit.

The completed fountainhead hot off the (3D) press!
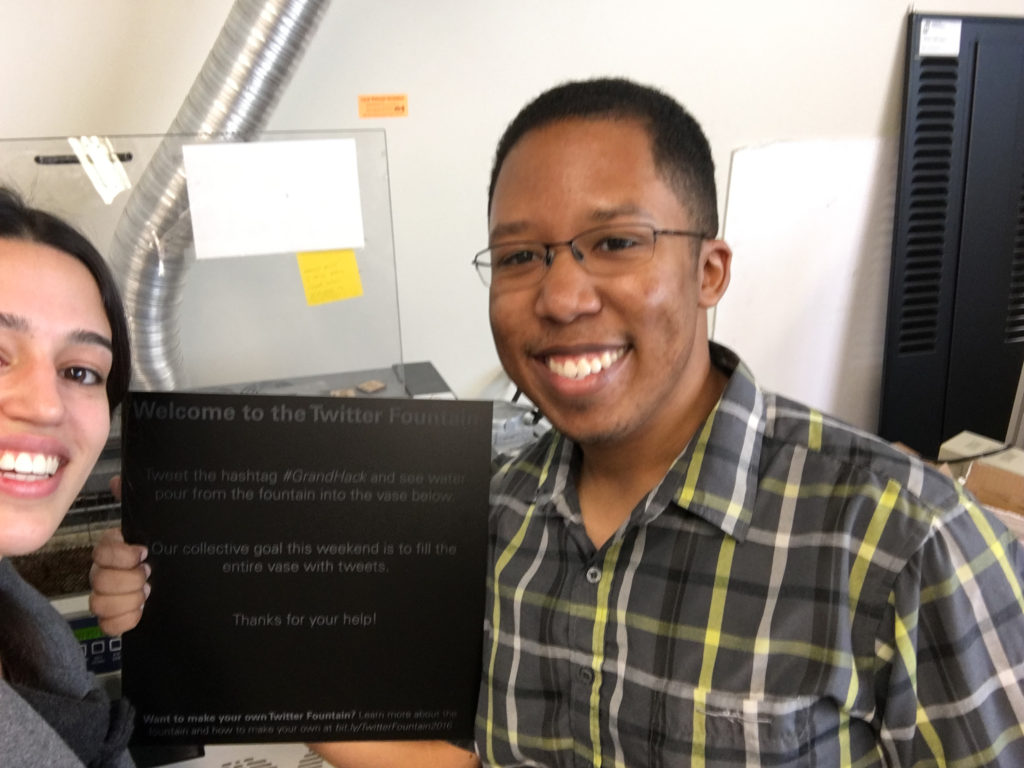
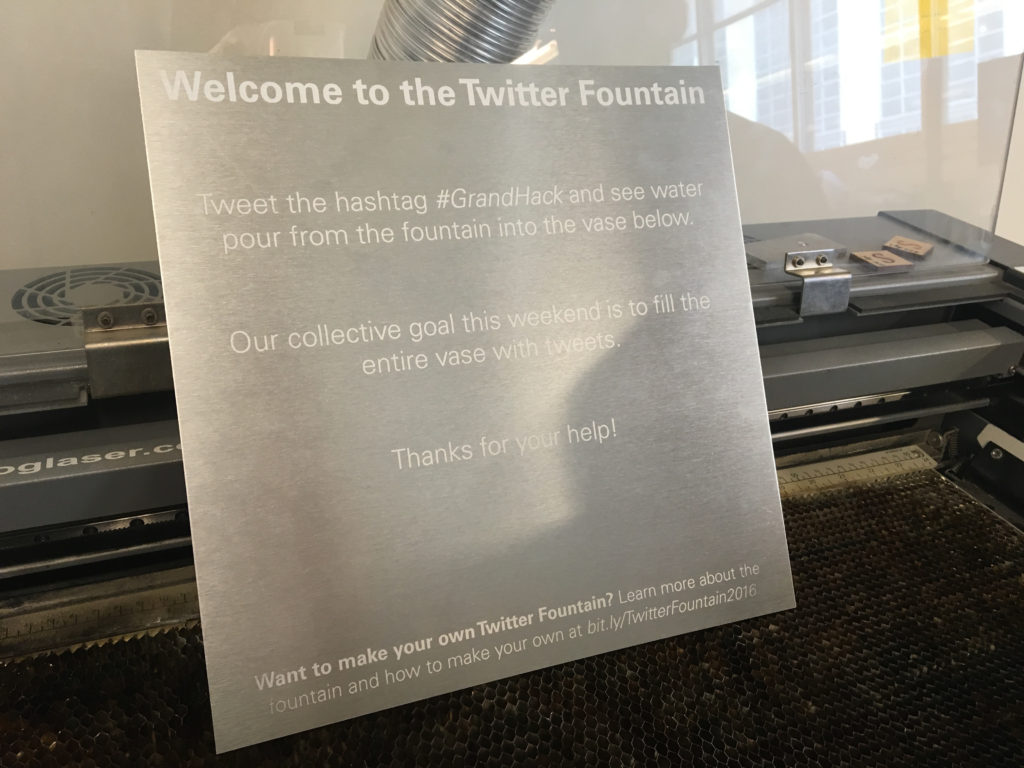
Step 8: The Sign
I laser-etched a piece of anodized aluminum to make a nice-looking sign to hang in front of the Twitter Fountain.
Thank you! A very big thank you to Marcel Thomas for his help making this sign! Marcel is an all around boss at making things and you can check out a sample of his work here: http://web.mit.edu/mact/www/index.html.
Here is the aluminum I used: McMaster Carr 6062K21 (I tried both silver and black)
Here is a pdf of the sign: Welcome Sign
Here is a 30sec video of the laser etching:
Here are the settings we used on the laser cutter for etching this.
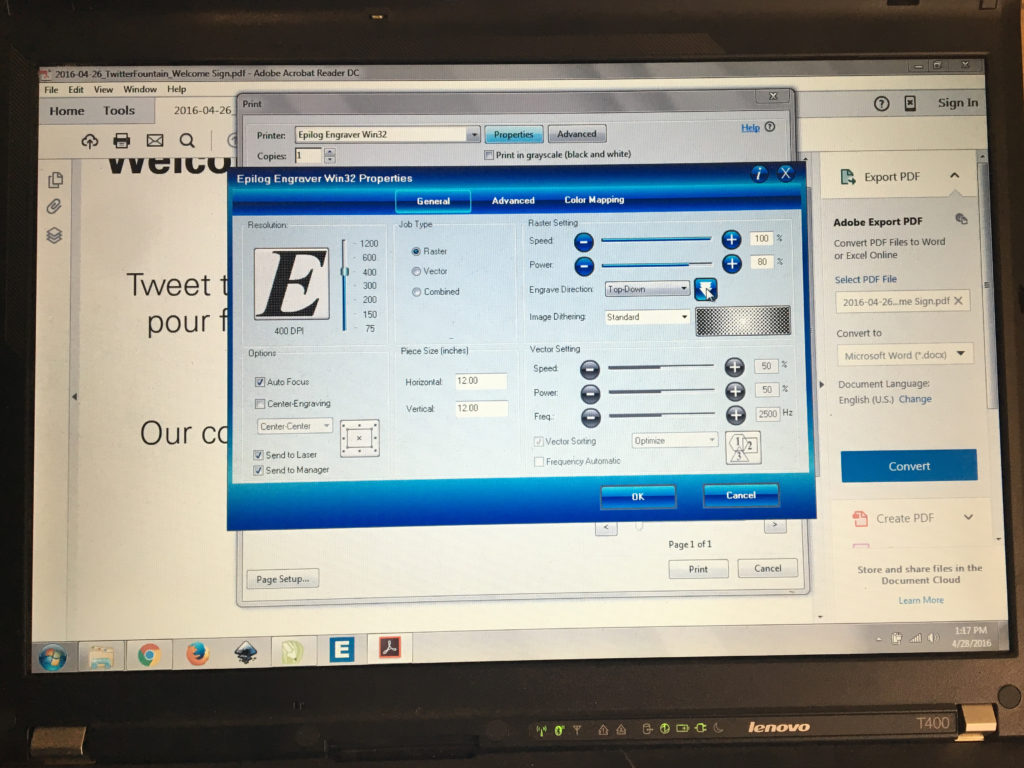
It worked really well. The main thing we learned is to make sure the piece of aluminum is completely flat, otherwise the etching will look uneven. Lay down a weight if necessary.
Step 9) Set it up
Voila! You are done! You just have to put all these parts together in your chosen area for display.
Please let me know if you make your own Twitter Fountain or something different that was inspired by this. I would love to know about it!
How to Reference This Tutorial
This tutorial is licensed under a Creative Commons License. You may copy the materials here for any purpose but must giver proper attribution.
Colucci, Lina A. Twitter Fountain. 2016. www.linacolucci.com

This work is licensed under a Creative Commons Attribution-ShareAlike 4.0 International License.
References
These tutorials are also licensed under the same Creative Commons license:
1 Raspberry Pi Twitter Monitor by Shawnymel. Sparkfun.com. https://learn.sparkfun.com/tutorials/raspberry-pi-twitter-monitor/all#the-twitterverse
2 Self-Watering Plant by randofo. Instructables.com. http://www.instructables.com/id/Self-Watering-Plant/?ALLSTEPS
Tweeting about the Twitter fountain – close to full! #GrandHack @mithackmed pic.twitter.com/vgDynaunGx
— Neelkanth Bardhan (@Neel_Bardhan) May 1, 2016
#grandhack Tweeting to the twitter fountain at MIT Hacking Medicine
— Anita Gupta (@DocAnitaGupta) May 1, 2016
One more #GrandHack drop in the Twitter fountain. Thanks @mithackmed – it’s been a great event!
— Brian M Bot (@BrianMBot) May 1, 2016
Getting meta by tweeting about #GrandHack fountain responding while someone tweets about #GrandHack@mithackmedpic.twitter.com/zDjQrEPaww
— Robert S. Pugliese (@theEDpharmacist) April 30, 2016
The Twitter Fountain is filling up – remember to tweet using the #GrandHack to fill it up. Let’s make it overflow! pic.twitter.com/pw8lhlilKT
— MIT Hacking Medicine (@mithackmed) April 30, 2016
The #GrandHack Twitter fountain! Blue downpour whenever you use the hashtag #GrandHackpic.twitter.com/knnCBHDgKl
— InterSystems (@InterSystems) April 29, 2016
Happy #StPatricksDay from @hackmedmit@KauffmanFDN#grandhack! The tweet fountain changed from blue to green for Day2 pic.twitter.com/JQ9FEFuZdj
— Mark D. Lim (@markdlim) March 16, 2014
Tweeting the twitter fountain! #GrandHackpic.twitter.com/3xqKshxKJE
— Ashwin Babu (@ashwinbabumd) May 1, 2016
Testing the Twitter fountain @medialab#GrandHackpic.twitter.com/xcq5YoAvwq
— Lynn Wang (@lynncwang) April 30, 2016
Check out the progress of the Twitter Fountain – keep tweeting with #GrandHack to keep it flowing! pic.twitter.com/rBjqWaLqQM
— MIT Hacking Medicine (@mithackmed) April 30, 2016
Day 2 of the Twitter Fountain at the #GrandHack! Going well but lots more tweeting to be done tomorrow! pic.twitter.com/w9DNXV5qVy
— Lina Colucci (@lina_colucci) May 1, 2016